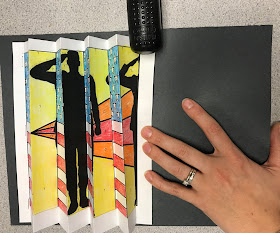
This week for Maker's Monday, we decided to try to create a Veterans Day Agamograph. They are very impressive and exciting for students to create. This one shows the American Flag on one side and soldiers saluting on the other side. I thought it might have been a bit challenging for third graders, but overall it went well. The key was that the coloring took a while, so students finished at all different times. This allowed for me to work with one or two students at a time to help assemble the agamographs. Then I could send students who finished out into the classroom to help their peers. I would not recommend this project for students younger than third grade (unless you have extra adults in the classroom to help). I hadn't planned on doing a tutorial, so bear with me as I try to explain how we created the agamograph.
Step 1: Have students color the two sheets carefully. They should color it according to the key that is provided.
 Step 2: Students will then fold each paper on the vertical lines. I found it easier if they folded and creased them in the some direction so that they could still see the lines. Once it was creased on every line, it was easier to then fold it like a fan. Look at the photo to see that the "flag" portions should be going "up".
  Step 3: Have students staple the white edge of the first paper (the one with the star part of the flag). They should put 2-3 staples on the white edge to secure it to construction paper.
  Step 4: Next have student staple the white portion of the paper to the middle of the construction paper. We did a staple at the top, middle, and bottom of the white.
  Step 5: Take the second creased paper and line it up so that the white edge overlaps the white edge you stapled down before. This is the trickiest part. I folded back the second paper so that I could staple it down. Again I stapled top, middle, and bottom. *When you unfold it, there should be no interruption in the illustration.
  Step 6: Fold back the second paper and staple the white flap to the far right side of the construction paper. We stapled at the top and the bottom. Mine laid flat, but if you have students who folded their papers a few times, their agamograph might need an extra staple or two in the middle of each paper. I have about 3 that needed an additional staple to keep theirs flat.
 These agamographs were a huge hit and my students were thrilled once they could see the final product! They instantly wanted to know if they could make another one. We hung the finished ones up and they looked very impressive! Click here to get the file for free this week only!
Enjoy!
~Heather


No comments:
Post a Comment